Monday, February 22, 2010

Brussels Sprouts and Smoky Onions on Cheddar Toast

I forget about certain foods all the time and before I know it 5 months have flown by and I haven't eaten one carrot, or a spoonful of peas and an ear of corn. And that makes me crazy. How could I possibly forget to eat some of the things I truly like?

Well, I feel like that with brussels sprouts, too. Now, Drew's not a big fan of these little guys which explains why we don't keep them around but that's changed. Last week, I went to the store and grabbed a big old bag of sprouts to make up for lost time. This recipe looks increadable and I cannot wait to test it out!

Brussels Sprouts and Smoky Onions on Cheddar Toast
From F&W
  1. 1 pound brussels sprouts, thinly sliced lengthwise
  2. 2 tablespoons extra-virgin olive oil
  3. 1 large onion, finely diced
  4. Salt and freshly ground pepper
  5. 1 teaspoon sweet smoked paprika
  6. 4 slices of multigrain bread, toasted
  7. 4 ounces extra-sharp cheddar cheese, thinly sliced
  1. Preheat the oven to 350°. In a saucepan of boiling salted water, cook the brussels sprouts until they are just tender, about 5 minutes. Drain and pat dry.
  2. Meanwhile, heat the olive oil in a large skillet. Add the onion, season with salt and pepper and cook over moderate heat, stirring occasionally, until just softened, about 5 minutes. Add the paprika, cover and cook over low heat, stirring frequently, until the onion is tender, about 10 minutes; add a little water if the onion dries out.
  3. Add the brussels sprouts to the skillet and cook until tender throughout, about 5 minutes. Season with salt and pepper.
  4. Arrange the toasts on a baking sheet and top with the cheddar. Bake for 2 minutes, until the cheese is melted; mound the brussels sprouts and onions on top and serve.


Share/Save/Bookmark

Thursday, February 11, 2010

Special Happy Hour at Press Club Tonight

Hey San Francisco! Want to help fight breast cancer by drinking half priced wines by the glass with a chance to score 2 Warriors basketball tickets? I figured you would...

Head down to Press Club TONIGHT on 4th and Market under the 4 Season hotel to enjoy some rockin' Oracle Red Wine and the other usual suspects. Happy hour runs from 6-9pm. Hope to see you all there!
Share/Save/Bookmark

Bibb Lettuce with Shrimp, Asparagus, and Chive Aïoli

Anybody out there feeling fat these days? Yeah, me too. It's called February.

This is the time of year where winter weather is getting realllly old, the holiday lbs are still lingering and you don't have a tan unless you get on a plane or go spray it on. February really is a drag.

One of the ways I like to swing into the spring mood is to eat a little lighter. This salad is easy to assemble and if you really want to lighten it up you can skip the aïoli and make a simple lemon vinaigrette at home. Hang in there, spring is right around the corner.

Bibb Lettuce with Shrimp, Asparagus, and Chive Aïoli 2 cups mayonnaise
  • 1/4 cup white wine vinegar
  • 1/4 cup chopped fresh chives
  • 2 tablespoons water
  • 2 garlic cloves, minced
  • 2 pounds asparagus, trimmed, cut into 1 1/2-inch pieces
  • 4 heads of Bibb lettuce, torn into bite-size pieces (about 24 cups)
  • 1 1/4 pounds cooked bay shrimp
  • 3 cups halved cherry tomatoes

Whisk first 5 ingredients in medium bowl. Season dressing with salt and pepper.

Cook asparagus in pot of boiling salted water until crisp-tender, about 2 minutes. Drain. Rinse under cold water. Drain well. (Dressing and asparagus can be made 1 day ahead. Cover separately and chill.)

Toss lettuce with half of shrimp, half of tomatoes, and half of asparagus in large shallow bowl. Top salad with remaining shrimp, tomatoes, and asparagus. Drizzle salad with dressing and serve.


Share/Save/Bookmark

Thursday, January 28, 2010

Chile Con Queso

The Super Bowl is just around the corner and that means it's time to start menu planning for a long day of drinking filled with snacks and small bites. Some of the usual suspects are buffalo wings (duh), sliders and potato skins but nothing beats a big bag of chips and and even bigger bowl of hot chile con queso.

This queso uses real cheese. Some folks were raised on Velveeta which melts nicely. The choice is really yours. There is no calorie counting on Super Bowl Sunday.

Chile Con Queso


1/2 onion diced (about 1/2 cup)
4 cloves of garlic minced
3 Serrano peppers diced
3 jalapeno peppers diced
2 tablespoons of butter
2 tablespoons of flour
1 cup of milk
6 cups of shredded cheese, can use any combination of Longhorn cheddar and Monterrey Jack
1/2 cup of cilantro, chopped
2 plum tomatoes, peeled and diced (about 1 cup, can use canned if tomatoes aren’t in season)
1/2 cup of sour cream
Salt to taste

Method:
1. Melt the butter in a saucepan on medium-low heat, and then cook the onions and peppers for about five minutes or until onions are translucent.
2. Add the garlic and cook for another minute.
3. Whisk the flour into the butter, vegetable mix and cook for about 30 seconds.
4. Add the milk to the pot, and cook on medium, whisking constantly until sauce is thick, about five minutes. Stir in the cilantro and tomatoes.
5. Turn heat down to low, and a 1/4-cup at a time, slowly add the shredded cheese stirring into the white sauce until completely melted. Repeat.
6. Stir in the sour cream.
7. Add salt to taste.
Share/Save/Bookmark

Thursday, January 21, 2010

Cheddar, Bacon, and Fresh Chive Biscuits

Don't tell me that these don't look good. I mean, who in their right mind doesn't LOVE flaky, delicious biscuits!

I can think of a million and one uses for this. Let's brainstorm for a sec just for kicks:
  • Cut down the middle and insert a fried egg
  • Smother with honey
  • Bon Appetit suggests Dijon, thin sliced ham and leaf lettuce for a sandwich
  • Add a small spoon full of sour cream on top and serve with grilled steaks
  • Make corn chowder and dip in the soup
The options are endless. Get baking!

Cheddar, Bacon, and Fresh Chive Biscuits
  • 6 thick-cut bacon slices
  • 3 3/4 cups bread flour
  • 1 1/2 tablespoons baking powder
  • 1 1/2 teaspoons baking soda
  • 1 1/4 teaspoons salt
  • 1/2 cup (1 stick) chilled unsalted butter, cut into 1/2-inch cubes, plus melted butter for brushing
  • 2 1/2 cups (packed) coarsely grated sharp cheddar cheese (about 12 ounces)
  • 1/3 cup chopped fresh chives
  • 1 3/4 cups chilled buttermilk
  • Honey (optional)
  • Position rack just above center of oven and preheat to 425°F. Line heavy large baking sheet with parchment paper. Cook bacon in heavy large skillet over medium heat until crisp and brown. Transfer bacon to paper towels to drain, then chop coarsely.
  • Combine flour, baking powder, baking soda, and salt in processor; blend 5 seconds. Add butter cubes. Blend until coarse meal forms, about 30 seconds.Transfer flour mixture to large bowl. Add cheddar cheese, fresh chives, and chopped bacon; toss to blend. Gradually add buttermilk, stirring to moisten evenly (batter will feel sticky).
  • Using lightly floured hands, drop generous 1/2 cup batter for each biscuit onto prepared baking sheet, spacing batter mounds about 2 inches apart.
  • Bake biscuits until golden and tester inserted into center comes out clean, 18 to 20 minutes. Brush biscuits lightly with melted butter. Let cool 10 minutes. Serve biscuits warm or at room temperature with honey, if desired.

Share/Save/Bookmark

Thursday, January 14, 2010

Warm Piquillo and Crab Dip

Piquillo peppers are not spicy rather they have terrific flavor that almost resembles a bell pepper but not as sweet. You can find them in specialty food stores in the canned foods isle.

Warm Piquillo and Crab Dip

  1. 1 pound lump crab, picked over
  2. 1/4 cup mayonnaise
  3. 1/4 cup crème fraîche
  4. 2 tablespoons chopped flat-leaf parsley
  5. 2 tablespoons snipped chives
  6. 1 tablespoon Dijon mustard
  7. 2 teaspoons fresh lemon juice
  8. 1/4 pound Manchego cheese, shredded (1 cup)
  9. One 9-ounce jar piquillo peppers, drained and cut into strips
  1. Preheat the broiler. In a bowl, combine the crab, mayonnaise, crème fraîche, parsley, chives, mustard, lemon juice and 3/4 cup of the Manchego. Spread in an 8-by-11-inch baking dish. Top with the piquillos and sprinkle with the remaining Manchego. Broil for 5 minutes, or until the cheese is melted and the dip is heated through. Serve hot.


Share/Save/Bookmark

Monday, January 11, 2010

Foie Gras with Date Purée and Pomegranate

I'm always looking for unique hors d'oeuvres to serve at my next party because I take them very seriously. A hors d'oeuvres is a cook's first impression and you only get one chance. Make sure to capitalize on this opportunity and challenge yourself. If you want to take it easy, do a cheese plate or salmon lox but just make sure to get really good ingredients no matter what the recipe.

Foie Gras with Date Purée and Pomegranate

yield: Makes 32 hors d'oeuvres

In these spectacular cocktail-ring-proportioned bites, the date purée gives surprising depth to the silky richness of foie gras. Add pomegranate... more
  • 1/4 pound Medjool dates (packed 1/2 cup), pitted
  • 1/2 cup boiling-hot water
  • 1 tablespoon plus 1 teaspoon pomegranate molasses
  • 1 large brioche loaf or challah loaf (1 to 1 1/2 pound)
  • 1 (6 1/2-ounces) block foie gras, chilled
Garnish: pomegranate seeds (from 1 pomegranate) preparation

Soak dates in boiling-hot water (1/2 cup) in a bowl 10 minutes. Transfer dates with a slotted spoon to a mini food processor or a blender along with 1 tablespoon soaking liquid. Add pomegranate molasses and purée until smooth.

Preheat broiler.

Cut enough 1/4-inch-thick slices from brioche to cut into a total of 32 (1 1/2-inch) squares (without crust).

Broil brioche squares on a baking sheet 4 to 5 inches from heat, turning once, until pale golden, about 1 1/2 minutes total. (Watch carefully; brioche toasts quickly.)

Dip a sharp paring knife in hot water, then dry it and halve foie gras lengthwise. Cut each half crosswise into 16 slices (32 total), dipping and drying knife after each cut. Put each slice as cut on top of a brioche toast, then top with a small dollop of date purée and a few pomegranate seeds.


Share/Save/Bookmark

Wednesday, January 6, 2010

Thomas Keller's Ad Hoc Fried Chicken


Napa locals and savvy visitors know to skip the French Laundry and Bouchon and roll up their sleeves for a meal at Ad Hoc instead. The idea for Ad Hoc came from Chef Keller himself which he describes as "simple - 5 days a week we'd offer a 4 course family style menu that changed each day, accompanied by a small, accessible wine list in a casual setting reminiscent of home. We wanted a place to dine for our community and ourselves." And he did just that.

I've had an Ad Hoc Christmas. My step dad gave me the beautiful cookbook and I scooped up some of the pre-made brine and batter at Williams-Sonoma. What some of you may not know is that Ad Hoc is known for its fried chicken. Let me tell you, this stuff is bomb. The batter and brine are easy to create yourself by following the recipe but if you have the pre-packed bag there are NO excuses! Make sure to serve with some mac & cheese and collard greens.

Thomas Keller's Ad Hoc Fried Chicken

1 gallon cold water
1 cup plus 2 teaspoons kosher salt
1/4 cup plus 2 tablespoons honey
12 bay leaves
1 head of garlic, smashed but not peeled
2 tablespoons black peppercorns
3 large rosemary sprigs
1 small bunch of thyme
1 small bunch of parsley
Finely grated zest and juice of 2 lemons
Two 3-pound chickens
3 cups all-purpose flour
2 tablespoons garlic powder
2 tablespoons onion powder
2 teaspoons cayenne pepper
2 cups buttermilk
Vegetable oil, for frying
Rosemary and thyme sprigs, for garnish
  1. In a very large pot, combine 1 quart of the water with 1 cup of the salt and the honey, bay leaves, garlic, peppercorns, rosemary, thyme and parsley. Add the lemon zest and juice and the lemon halves and bring to a simmer over moderate heat, stirring until the salt is dissolved. Let cool completely, then stir in the remaining 3 quarts of cold water. Add the chickens, being sure they're completely submerged, and refrigerate overnight.
  2. Drain the chickens and pat dry. Scrape off any herbs or peppercorns stuck to the skin and cut each bird into 8 pieces, keeping the breast meat on the bone.
  3. In a large bowl, combine the flour, garlic powder, onion powder, cayenne and the remaining 2 teaspoons of salt. Put the buttermilk in a large, shallow bowl. Working with a few pieces at a time, dip the chicken in the buttermilk, then dredge in the flour mixture, pressing so it adheres all over. Transfer the chicken to a baking sheet lined with wax paper.
  4. In a very large, deep skillet, heat 1 inch of vegetable oil to 330°. Fry the chicken in 2 or 3 batches over moderate heat, turning once, until golden and crunchy and an instant-read thermometer inserted in the thickest part of each piece registers 160°, about 20 minutes. Transfer the chicken to paper towels to drain, and keep warm in a low oven while you fry the remaining chicken pieces. Transfer the fried chicken to a platter, garnish with the herb sprigs and serve hot or at room temperature.

Share/Save/Bookmark

Grandmother Shaw's Sugar Cookies

My dad sent out an email this week to some family members trying to track down my grandmother's sugar cookie recipe. After a little back and forth, he was able to get it and share it with all of us. Sugar cookies are simple and delicious but dangerous to keep around the house. You can never stop at one so I recommend doubling the batch.

Grandmother Shaw's Sugar Cookies

1 CUP SHORTENING
2 CUPS SUGAR
2 EGSS
3 1/2 CUPS FLOUR
4 TSP BAKING POWDER
1 TSP SALT
1 TSP VANILLA
1 TABLESPOON MILK

CREAM SUGAR AND SHORTENING. ADD EGGS, ONE AT A TIME. BEAT AFTER EACH ADDITION.

CHILL DOUGH FOR 1 HOUR.

ROLL OUT DOUGH, CUT INTO ROUNDS.

BAKE AT 350 FOR 8 MINUTES OR UNTIL LIGHTLY BROWNED.
Share/Save/Bookmark

Monday, January 4, 2010

Chicken Paillards with Clementine Salsa

Happy New Year, Dear Reader!

The last 10 days in Chicago felt like a month but now I am back home in sunny San Francisco ready to start cooking again. First up is this recipe by Lora Zarubin that takes advantage of clementines in the height of their season. This is an easy recipe for a weeknight or casual dinner party with some friends.

Chicken Paillards with Clementine Salsa
  • 4 5-ounce chicken breast halves
  • 4 clementines, peeled, diced (about 1 cup)
  • 1 cup cherry tomatoes, quartered
  • 1/2 cup finely diced red onion
  • 1/2 cup finely diced celery
  • 1/4 cup coarsely chopped fresh basil
  • 1/4 cup coarsely chopped fresh cilantro
  • 2 tablespoons extra-virgin olive oil
  • 2 tablespoons fresh lime juice
  • 1 serrano chile, seeded, minced
  • 2 tablespoons olive oil
  • 1/2 cup fresh clementine juice (from about 6 clementines)
  • Place chicken breast halves between 2 sheets plastic wrap or parchment paper, spacing apart. Using mallet, pound chicken to 1/4-inch thickness. DO AHEAD Can be made 1 day ahead. Cover and chill.
  • Mix clementines and next 8 ingredients in medium bowl. Season with salt and pepper. DO AHEAD Salsa can be made 2 hours ahead. Cover; let stand at room temperature.
  • Uncover chicken; sprinkle with salt and pepper. Heat olive oil in large nonstick skillet over medium-high heat. Add chicken and cook until slightly browned and cooked through, about 3 minutes per side. Transfer chicken to platter. Add clementine juice to skillet; boil until reduced to 1/4 cup, stirring often, about 2 minutes. Drizzle sauce over chicken. Spoon salsa over and serve.

Share/Save/Bookmark

Monday, December 21, 2009

Horseradish-and-Herb-Crusted Beef Rib Roast

This rib roast is the perfect wow-factor for the holidays and big enough to feed a small army. Food and Wine Magazine suggests serving it with popovers and I second that idea!

Horseradish-and-Herb-Crusted Beef Rib Roast
  1. 2 sticks unsalted butter, softened
  2. 1 head of garlic, cloves coarsely chopped
  3. 1 cup prepared horseradish
  4. 1/4 cup plus 2 tablespoons chopped thyme
  5. 3 tablespoons chopped rosemary
  6. 3 tablespoons chopped sage
  7. One 16-pound rib roast of beef
  8. Salt and freshly ground pepper
  1. Preheat the oven to 325°. In a food processor, combine the butter with the garlic, horseradish, thyme, rosemary and sage and process to a paste.
  2. Stand the roast in a very large roasting pan. Season generously all over with salt and pepper and set it fatty side up. Spread the horseradish-herb butter all over the top. Bake for about 3 1/2 hours, until an instant-read thermometer inserted in the center registers 125° for medium rare. Transfer the roast to a carving board to rest for at least 20 minutes or for up to 1 hour before serving.
    The horseradish-herb butter can be refrigerated overnight. Let the butter soften before using.

Share/Save/Bookmark

Thursday, December 17, 2009

Brown Sugar-Pecan Sticky Buns

Our family has some wonderful holiday food traditions that I look forward to each year. However, I am always looking to add new things that I find 'worthy'. This sticky bun recipe from Bon Appetit looks like it has just the right amount of sugar I'll need this Christmas to try to keep up with my young nieces and nephews.

Brown Sugar-Pecan Sticky Buns
  • 1 1/2 cups (packed) golden brown sugar
  • 3/4 cup (1 1/2 sticks) unsalted butter, diced
  • 3/4 cup honey
  • 3 cups pecan halves
  • 1/2 cup sugar
  • 6 tablespoons golden brown sugar
  • 1 tablespoon ground cinnamon
  • Spiced Sweet Dough (click for recipe)
  • 4 tablespoons (1/2 stick) unsalted butter, warm room temperature
  • Butter two 13x9x2-inch glass baking dishes. Whisk sugar, butter, and honey in small saucepan over medium-low heat until smooth and bubbling around sides. Divide hot syrup between prepared baking dishes, allowing topping to cover bottom of each dish. Place pecan halves, rounded side down, in syrup, dividing equally. Cool.
  • Whisk both sugars and cinnamon in small bowl.
  • Turn cold Spiced Sweet Dough out onto floured surface; sprinkle with flour. Divide dough in half. Roll out dough to two 15x12-inch rectangles. Using fingers, spread 2 tablespoons butter evenly over each rectangle. Sprinkle cinnamon sugar over each. Starting at 1 long side of each dough rectangle, tightly roll up dough jelly-roll style, enclosing filling. Using large knife, cut each roll crosswise into fifteen 1-inch-thick slices. Arrange 15 dough slices, cut side down, atop cooled syrup and pecan halves in each baking dish, spacing evenly apart. Cover with waxed paper; let rise in warm draft-free area until buns are puffy and doubled, about 1 hour 45 minutes.
  • Position 1 rack in top third and 1 rack in bottom third of oven; preheat to 375°F. Line 2 rimmed baking sheets with parchment; place dishes with sticky buns on baking sheets. Bake buns until deep golden brown and filling is barely bubbling around edges, about 25 minutes. Let buns stand 2 minutes. Cut around sides of buns to loosen. Place large rimmed platter atop each baking dish. Using oven mitts, firmly hold baking dish and platter together and invert buns onto platter. Cool at least 45 minutes. Serve slightly warm or at room temperature.

Share/Save/Bookmark

Eggnog Tart

Nothing screams the holidays like eggnog so try jazzing up your menu this season with an eggnog tart. This recipe from Saveur is pretty straight forward and will knock your stockings off!

Eggnog Tart

Makes 10" tart

FOR THE CRUST:
1 1⁄2 cups all-purpose flour
1 tbsp. sugar
Pinch salt
8 tbsp. unsalted butter, cut into small pieces
2 tbsp. vegetable shortening
2–4 tbsp. dark chocolate, melted

FOR THE FILLING:
3 cups heavy cream
5 tbsp. sugar
1⁄2–3⁄4 cup bourbon
Half a vanilla bean, split lengthwise
6 egg yolks
1 envelope gelatin, softened

1. For the crust: Preheat oven to 450°. Sift flour, sugar, and salt together into a mixing bowl. Use a pastry cutter or 2 table knives to work butter and shortening into flour mixture until it resembles coarse meal. Add up to 5 tbsp. ice water, stirring dough with a fork until it holds together. Form dough into a ball, wrap in plastic, and refrigerate for 30 minutes. Roll dough out on a lightly floured surface into a 14" round. Fit dough, without stretching it, into a 10" tart pan, then prick bottom lightly with a fork. Line dough with foil, then add dried beans or pie weights. Bake for 10 minutes, then remove foil and beans and bake for another 2–5 minutes. Brush bottom and sides with chocolate. Set aside to let cool.

2. For the filling: Put 2 cups of the cream, 4 tbsp. of the sugar, bourbon, and vanilla bean together in the top of a double boiler above simmering water over medium heat. Cook, stirring often, until bubbles appear around edge of cream, about 20 minutes. Meanwhile, whisk egg yolks in a mixing bowl until pale yellow. Continue whisking while adding 1⁄2 cup of the hot cream mixture, then pour yolk mixture into cream mixture in the double boiler, stirring with a wooden spoon. Add gelatin and stir to dissolve. Remove vanilla bean. Set aside to let cool, then strain filling into tart shell and refrigerate until set, about 4 hours.

3. Whisk remaining cream with remaining sugar in a large bowl until soft peaks form. Garnish tart with whipped cream and confectioners' sugar, if you like.


Share/Save/Bookmark

Mini Brioche Lobster Rolls

We all know that I am obsessed with lobster in all of its shapes and forms so it should come as no surprise that this recipe lept off the page as I was flipping through this month's Food & Wine Magazine. These are perfect for holiday entertaining or for early afternoon snacks.

Mini Brioche Lobster Rolls
  1. 3/4 pound cooked lobster meat, crabmeat or shrimp, coarsely chopped
  2. 1/4 cup plus 2 tablespoons mayonnaise
  3. 1 teaspoon chopped tarragon
  4. 1/2 teaspoon finely grated lemon zest
  5. Salt and freshly ground pepper
  6. 12 mini brioche or Parker House rolls (about 2 1/2 inches)
  7. Snipped chives, for garnish
  1. In a food processor, combine the lobster with the mayonnaise, tarragon and lemon zest and pulse to a chunky paste. Season with salt and pepper.
  2. Using a paring knife, cut a 1 1/2-inch-round plug out of the top of each roll, leaving a 1/2-inch border all around. Using a small spoon, carefully hollow out the rolls. Spoon the lobster filling into the rolls, garnish with the chives and serve.
    The lobster salad can be refrigerated for up to 2 days. The mini lobster rolls can be refrigerated in an airtight container for up to 3 hours.

Share/Save/Bookmark

Monday, December 7, 2009

Asparagus & Meyer Lemon Risotto with Butter-Poached Shrimp

I was pretty excited to see our Meyer lemon tree in full force up in Napa this weekend. I harvested a full grocery bag worth and brought them back to San Francisco. The first thing that came to mind last night as the chill rolled in over the bridge... risotto and butter-poached shrimp.

I am a lobster junkie but I never cook it at home or make it for guests because it's so down-right expensive at times. So, in the case, I subbed for some medium sized shrimp that I butter- poached and served right on top. You could also sub scallops, prawns or halibut.

Lobster is a treat so I usually order it out on special occasions. In fact, I plan on ordering it on my 30th birthday this Thursday at Fleur de Lys but more on that later in the week.

Asparagus & Meyer Lemon Risotto with Butter-Poached Shrimp

1 cup asparagus
1/2 cup dry white wine
3 ½ cups chicken stock
1 tbsp butter
2 shallots, minced
1 cup Arborio rice
zest of 2 Meyer lemons
juice of 2 Meyer lemons
salt & pepper
3 tbsp grated parmesan cheese
16 medium shrimp, raw, tails removed and devained

Blanch asparagus in boiling water for two minutes. Shock with cold water to stop the cooking and drain well. Cut into one inch pieces and set aside.

Bring chicken stock to a boil in a saucepan. Cover and turn heat to low.

In a Dutch oven, sauté shallots in butter over medium heat until light brown, about 4 minutes. Add rice and lemon zest. Stir to coat in butter/shallot mixture for 1-2 minutes. Add wine and let reduce on medium high heat for about 3 minutes to burn off alcohol. Add 1-1 ½ cups stock and reduce heat to low.

Stirring regularly to make sure rice doesn’t stick to the pan, add stock in ½ cup additions as the rice absorbs liquid. Check the rice before the last addition to see if it is done (rice should be al dente, not mushy). Add lemon juice into the rice with the last addition of stock.

As the lemon juice is absorbed, add asparagus, salt and pepper to taste. Stir two
minutes then remove from heat. Stir in parmesan cheese and serve.

Butter-Poached Shrimp

- 1 tbsp water
- 1 lb unsalted butter, cut into small chunks
- shrimp (see above for prep)

Bring shrimp to room temperature.

In a saucepan, heat water until boiling and whisk in one or two chunks of butter to form an emulsion. Reduce heat to low and continue to whisk in butter, one chunk at a time, until the sauce is about 1-inch high.

Use an instant-read thermometer to maintain the temperature of the sauce between 160F and 190F during cooking.

Add shrimp and cook for 5 or 6 minutes. If shrimp are not fully covered, use a spoon to gently turn over after 3 minutes.

Serve immediately over risotto.
Share/Save/Bookmark

Monday, November 30, 2009

Mike's Famous Holiday Eggnog


For the 3rd year in a row and back by popular demand... Mike's Famous Holiday Eggnog! This is a holiday must.

Below is the genesis of the holiday party starter told by Mike himself...

Christmas Eggnog


I never cook anything. Most of my friends and family are wonderful cooks so I try to be what every chef needs--an enthusiastic eater and kitchen helper. One thing I do prepare each Holiday Season is the eggnog. I first made this eggnog when I was in college and worked occasionally as a bartender for private parties. When a call came in to the student employment office for a bartender to mix large batches of eggnog for a Christmas party in Woodside I was the only one who claimed to have eggnog experience. I had, of course, lied about my experience and had never drunk a cup of eggnog. This extreme confidence in the face of total ignorance got me the job.

The first research I did was to buy a carton of dairy eggnog, pour it into a cup, and add a good dose of whiskey. It was terrible. It ruined the whiskey. I then indulged in some real research in the card catalog of the main library. After noting the Dewey Decimal numbers for the cookbook section (641.5) I plunged into the stacks and fumbled through all the dusty books until I recognized one from my mother's kitchen--the Joy of Cooking. It had a drink recipe for "Eggnog in Quantity" and I was saved. I couldn't check the book out because I had some unpaid delinquent fines so I wrote it all down (I still have that piece of tablet paper).

Two days before the party I called my employer and with all the authority I could muster gave her a specific list of all the required ingredients, stated that there could be no exceptions, and said that I would need to be at work in her kitchen three hours before the party to prepare properly. The eggnog was so well received that I was given a big tip and hired to do it again the following year. I have been making it for friends and family ever since.

Merry Christmas,

Mike

Eggnog in Quantity

• Be sure to use good fresh eggs. The best eggs have a firm orange yolk and are from hens that have access to free range.
• Use heavy whipping cream. This is not a drink that is successful in a low fat version.
• Use good quality liquor. I use a combination of liquors to spread out the flavors. The saying that "nothing succeeds like excess" is especially true when it comes to adding booze to the eggnog. The Brits say that "Christmas brandy will make you randy", so add an extra splash.
• Use fresh nutmeg kernels and grate onto each serving as desired.

Beat separately until light in color
12 egg yolks
Beat in gradually
1 lb. confectioner's sugar
Add very slowly, beating constantly
2 c. dark rum, brandy, or bourbon
These liquors form the basis of the "nog", and you may choose one
variety or mix to taste.

Let mixture stand covered for 1 hour to dispel the "eggy" taste.

Add, beating constantly,
3 cups of liquor (I use a combination and include some Kahlua)
2 quarts whipping cream
1 tsp vanilla (or to taste)
Refrigerate covered for 3 hours.

Beat until stiff but not dry
12 egg whites

Fold egg whites lightly into the other ingredients. Serve sprinkled
with fresh nutmeg and cinnamon to taste.

Yield is about 1 gallon. I always make a double batch. With all that liquor it keeps very well refrigerated. The egg whites will separate after standing so fold them back in. A jar of this eggnog makes a great holiday present. Have a cup while opening your presents. You'll love them all!

This is a very rich, high-cholesterol, high-octane eggnog. Do not operate heavy equipment after drinking.
Share/Save/Bookmark

Eggs Benedict

Eggs Benedict is an absolute favorite of mine. As you can see above, I whipped up a decent platter of these bad boys last weekend in Napa for my family. People seem to think that this is a hard meal to prepare but I beg to differ. Here's the trick: It's all about timing and if you can get an extra hand (or two) you're set. Listen up...

Blender hollandaise is foolproof. Just add the hot butter very, very slowly so it doesn't cook the egg. Delegate poaching the eggs to one person. That way, everything will come together at once and the hollandaise doesn't get cold. Be sure to add white vinegar to the boiling water as it helps to separate the eggs. Watch the eggs closely so you do not overcook the yolk. You want it to be runny. Lastly, toast your muffins and warm your meat in the oven on a cookie sheet. If you put the oven on at 325 degrees you can keep a close eye on your muffins and they won't burn as quickly as they would if you were toasting and broiling them. You will need to allow extra time for them to toast that way...I suggest 12 or so minutes.

All the assembly happens at the very end so get your assembly line in order and crank it out. Be sure to finish each serving with some fresh lemon juice, a sprinkle of paprika and some parsley. I like to serve mine with some roasted potatoes.

Eggs Benedict
Serves 6
  • Water
  • 1/2 cup distilled vinegar, divided
  • 12 large eggs
  • 1 tablespoon unsalted butter
  • 12 slices Canadian bacon (can sub with lobster, black forest ham, prosciutto and much more!)
  • 6 plain English muffins
  • HOLLANDAISE SAUCE, recipe follows
  • 1 tablespoon finely chopped fresh flat-leaf parsley leaves
  • lemon for serving

Pour enough water into 2 large skillets to reach a depth of about 3 inches, and divide the vinegar between them. Bring both skillets to a gentle simmer over medium heat. Crack an egg into a cup and carefully slide it into the hot poaching liquid. Quickly repeat with all the eggs. Poach the eggs, turning them occasionally with a spoon, until the whites are firm, or to the desired degree of doneness, about 3 to 5 minutes. Using a slotted spoon, remove the eggs and transfer to a kitchen towel. Lightly dab the eggs with the towel to remove any excess water.

While the eggs are poaching, melt the butter in a large skillet over medium heat. Add the Canadian bacon and cook until heated through, about a minute on each side (or heat in oven).

To serve, toast the English muffin halves and divide them among 6 warmed plates. Top each half with a slice of Canadian bacon, and set an egg on top. Spoon the hollandaise sauce over the eggs and garnish. Serve immediately.

Blender Hollandaise

1/2 cup butter
3 egg yolks
1 Tbsp. lemon juice
Dash of cayenne pepper

Place egg yolks in blender with the lemon juice, turn blender on high speed for 5 seconds to blend. Melt butter in microwave until almost boiling. Turn blender back on high speed and gradually pour in butter. It will thicken into a beautiful yellow hollandaise in 20-40 seconds. The sauce may be kept warm by placing the blender bowl in warm water. The sauce cannot be reheated.

Share/Save/Bookmark

Tuesday, November 24, 2009

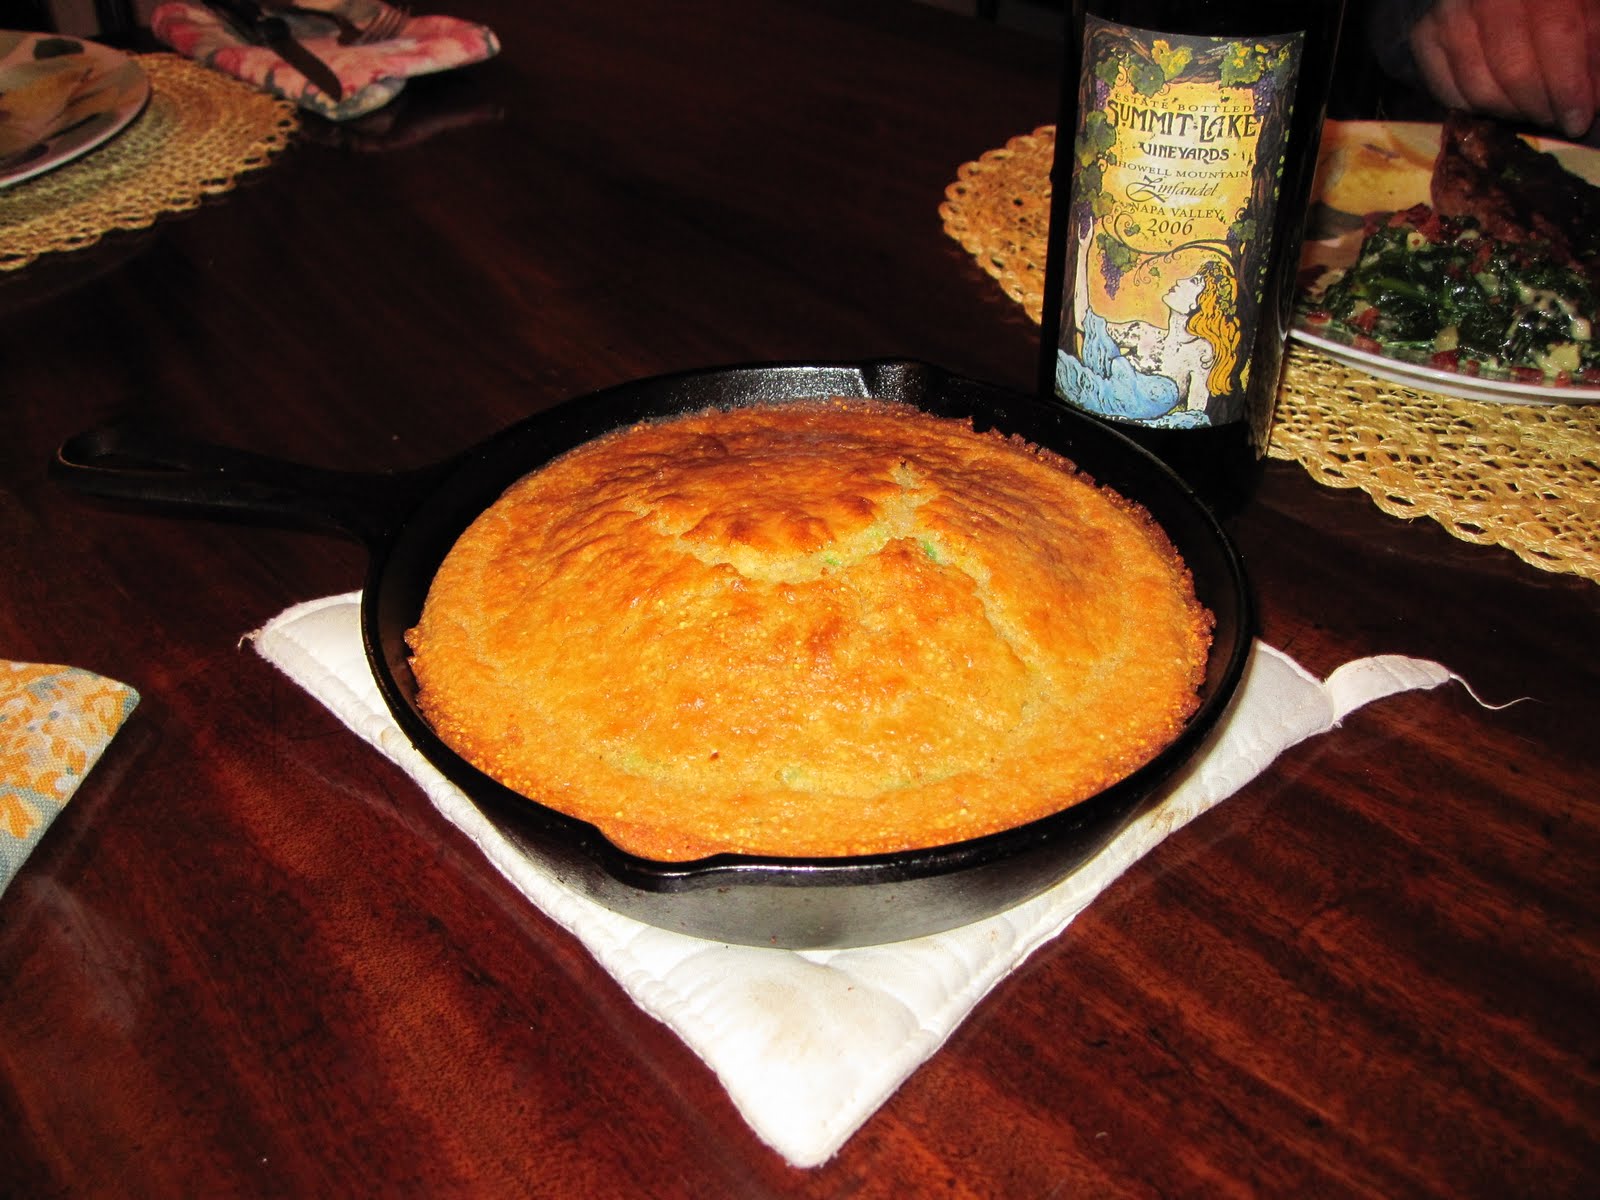
Test Kitchen: Rutherford Grill's Cornbread

This weekend, my step-dad bought a skillet and challenged me to recreate Rutherford Grill's popular cornbread. When I snooped around for a recipe, I quickly found out that it was a house secret. We know the flavor profile because we have had the cornbread so many times so we started there and created a recipe from scratch. After three attempts, we finally nailed it. Here is our variation of Napa Valley's Rutherford Grill Cornbread.

A couple things:
1) Don't even think about making this with out the skillet
2) Buy 2 ears of corn, grill them until charred brown and cut off the cob
  • 2 ears of corn
  • 1/2 stick (1/4 cup) cold unsalted butter, cut into pieces
  • 1/4 cup vegetable oil
  • 1 1/2 jalapenos, fine dice with some seeds
  • 1 1/4 cups cornmeal (preferably stone-ground; not coarse)
  • 1/4 cup all-purpose flour
  • 1 tablespoon sugar
  • 1 teaspoon baking soda
  • 1/2 teaspoon salt
  • 1 1/2 cups well-shaken buttermilk
  • 2 large eggs
  • 1 teaspoon of bacon lard (optional)
  • 2 tablespoons honey
  • Special equipment: a 9 1/2- to 10-inch well-seasoned cast-iron skillet
Heat grill to medium high. Lightly brush corn with oil and grill turning every 3 minutes until charred and golden brown. Cut kernels off of cobs. Set aside.

Put oven rack in middle position and preheat oven to 450°F. Add butter, lard and oil to skillet and heat in oven until melted, about 5 minutes, then carefully pour into a medium bowl.

Whisk together cornmeal, flour, sugar, jalapeno, baking soda, and salt in a large bowl.

Whisk buttermilk and eggs into melted butter, then stir into cornmeal mixture until just combined. Pour into hot skillet and bake until a wooden pick or skewer inserted in center comes out clean, 15 to 20 minutes. Cool in skillet on a rack 5 minutes.


Share/Save/Bookmark

Wednesday, November 18, 2009

Dad's Thanksgiving Caviar


One of the things I love about food is that it is the absolute root of all celebrations. Thanksgiving? Turkey. Easter? Brunch. 4th of July? BBQ!

As I have mentioned several times on here, my aunt's Thanksgiving is bomb. But this post isn't about one of her awesome recipes, it's actually about my dad's contribution for the day... house-cured salmon caviar with homemade bellinis.

Now, my dad has always been a stellar fisherman. I have countless stories about fishing with him while I was young. How many people you know got a fly rod for their college graduation? Enough said. Knowing this and LIVING this, I am somewhat disappointed in myself that when I asked him for "that fish appetizer [he does] on Thanksgiving" that I was surprised at how down-right hard core it was. Here I am thinking, "go to the store, grab some bagels, buy cream cheese, cured salmon..." I was way off.

Turns out my dad puts his waders on and heads to a stream (usually in Michigan) in September and targets female salmon. He can actually t-a-r-g-e-t fish. Sheesh. He then takes them (yes, that's plural) home and cures the eggs for over 30 days in his fridge and brings them to Thanksgiving with all the fixings. He also makes homemade bellinis which he freezes and serves thawed out on Thanksgiving day. To wash it down, he suggests Champagne or a chilled flute of vodka.

Sorry to miss the festivities this year everyone. I love you all!

Preparing Roe for Caviar
Joy of Cooking

Remove from roe from fish as soon as possible. Tear the egg masses into small pieces. Work them through a 1/4 inch or finer sieve to free the eggs from the membrane. Place them for 15-20 minutes in a cold brine of 1cup plus 2 tablespoons pickling salt per quart of cold water. There should be twice as much brine than roe. Remove from liquid and drain thoroughly in a strainer for about 1 hour. Keep refrigerated during this operation.

Place the strained roe in an airtight nonmetal container and store at 34 degrees for 1 to 2 months. Remove, repack, and store at 0 degrees until ready for use.
Share/Save/Bookmark

Thursday, November 5, 2009

Roast Turkey with Fried Sage and Pecans

OMG, are you as excited about the holidays as I am?!? We are about to enter into my absolute favorite time of the year where countless celebrations and festivities take place that are surrounded by great food, wine and bubbly. It's really the only time of year where gaining weight is socially acceptable and encouraged. They didn't make the gym a new year's resolution for nothing. So let's get started on some planning! First step, the Thanksgiving turkey.

If you can't get your hands on turkey stock, no big deal. Sub chicken.

Roast Turkey with Fried Sage and Pecans
F&W
Ingredients
  1. 1 cup pecans
  2. 1 cup canola oil, for frying
  3. 1 large garlic clove, smashed
  4. 1 cup sage leaves
  5. 2 sticks unsalted butter, softened
  6. Kosher salt
  7. 1/4 cup all-purpose flour
  8. One 18-pound turkey
  9. 1 carrot, cut into 1-inch pieces
  10. 1 onion, cut into 1-inch wedges
  11. 4 cups Turkey Stock
  1. Preheat the oven to 350°. Spread the pecans in a pie plate and toast in the oven for about 10 minutes. Transfer the pecans to a food processor and let cool completely.
  2. In a medium skillet, heat the oil. Add the garlic and cook over moderate heat until very lightly golden, about 1 minute. Add the sage leaves and fry, stirring gently, until crisp, about 2 minutes. Using a slotted spoon, transfer the sage leaves and garlic clove to a paper towel–lined plate and let cool. Add half of the sage leaves and the garlic clove to the food processor along with the butter and 1 tablespoon of salt; pulse until smooth. Transfer 1/4 cup of the butter to a small bowl and stir in the flour; reserve.
  3. Beginning at the neck end, gently separate the turkey skin from the breast and legs using your fingers. Season the turkey cavity with salt. Rub half of the pecan-sage butter from the food processor under the skin, spreading it over the breast and thighs.
  4. Set the turkey on a rack in a large roasting pan and scatter the carrot and onion in the pan; add 1 1/2 cups of water. Rub the remaining pecan-sage butter from the food processor all over the outside of the turkey. Roast on the bottom rack of the oven for 3 1/2 to 4 hours, until an instant-read thermometer inserted deep in the thigh registers 170°; halfway through roasting, add 1 1/2 cups of water to the roasting pan and tent the turkey with foil. Transfer the turkey to a carving board and let rest for 30 minutes.
  5. Meanwhile, strain the pan juices into a large measuring cup; discard the solids. Spoon off the fat and discard it. (You should have about 2 cups of defatted pan juices.) In a large saucepan, boil the turkey stock until it is reduced to 3 cups, about 15 minutes. Set the roasting pan over 2 burners on high heat; add the reduced stock and scrape up any browned bits stuck to the bottom and side of the pan. Strain the stock into the saucepan, add the pan juices and bring to a simmer. Whisk in the reserved pecan-sage butter with flour and simmer over moderate heat, whisking constantly, until thickened, about 4 minutes. Season with salt.
  6. Carve the turkey, transfer to a platter and garnish with the reserved sage leaves. Serve the turkey, passing the gravy at the table.

Share/Save/Bookmark