Monday, January 24, 2011

Kale & White Bean Soup

I was in Boston last week and caught a miserable sinus infection. Usually when I am sick, I am not hungry which is a double-whammy bummer. But not this time...I am actually hungry! Last night, I managed to drag myself 4 blocks down the store to pick up some white kidney beans and a bunch of black kale. The kale is packed with nutrients and I knew a soup would soothe my throat. This recipe from epicurious hit the spot and made for a good leftover lunch this afternoon.

Kale & White Bean Soup
1 lb dried white beans such as Great Northern, cannellini, or navy
2 onions, coarsely chopped
2 tablespoons olive oil
4 garlic cloves, finely chopped
5 cups chicken broth
2 qt water
1 (3- by 2-inch) piece Parmigiano-Reggiano rind
2 teaspoons salt
1/2 teaspoon black pepper
1 bay leaf (not California)
1 teaspoon finely chopped fresh rosemary
1 lb smoked sausage such as kielbasa (optional), sliced crosswise 1/4 inch thick
8 carrots, halved lengthwise and cut crosswise into 1/2-inch pieces
1 lb kale (preferably lacinato), stems and center ribs discarded and leaves coarsely chopped

Preparation
Cover beans with water by 2 inches in a pot and bring to a boil. Remove from heat and let stand, uncovered, 1 hour. Drain beans in a colander and rinse.

Cook onions in oil in an 8-quart pot over moderately low heat, stirring occasionally, until softened, 4 to 5 minutes. Add garlic and cook, stirring, 1 minute. Add beans, broth, 1 quart water, cheese rind, salt, pepper, bay leaf, and rosemary and simmer, uncovered, until beans are just tender, about 50 minutes.

While soup is simmering, brown sausage (if using) in batches in a heavy skillet over moderate heat, turning, then transfer to paper towels to drain.

Stir carrots into soup and simmer 5 minutes. Stir in kale, sausage, and remaining quart water and simmer, uncovered, stirring occasionally, until kale is tender, 12 to 15 minutes. Season soup with salt and pepper.
Share/Save/Bookmark

Tuesday, January 18, 2011

Markets in Vietnam

These chickens were alive and stacked on top of one another ready for purchase. Yes, these are snakes. They make local 'hooch' with rice wine and dead snakes. It takes about 7 months to ferment. We tried a shot of this and it will put hair on your chest.

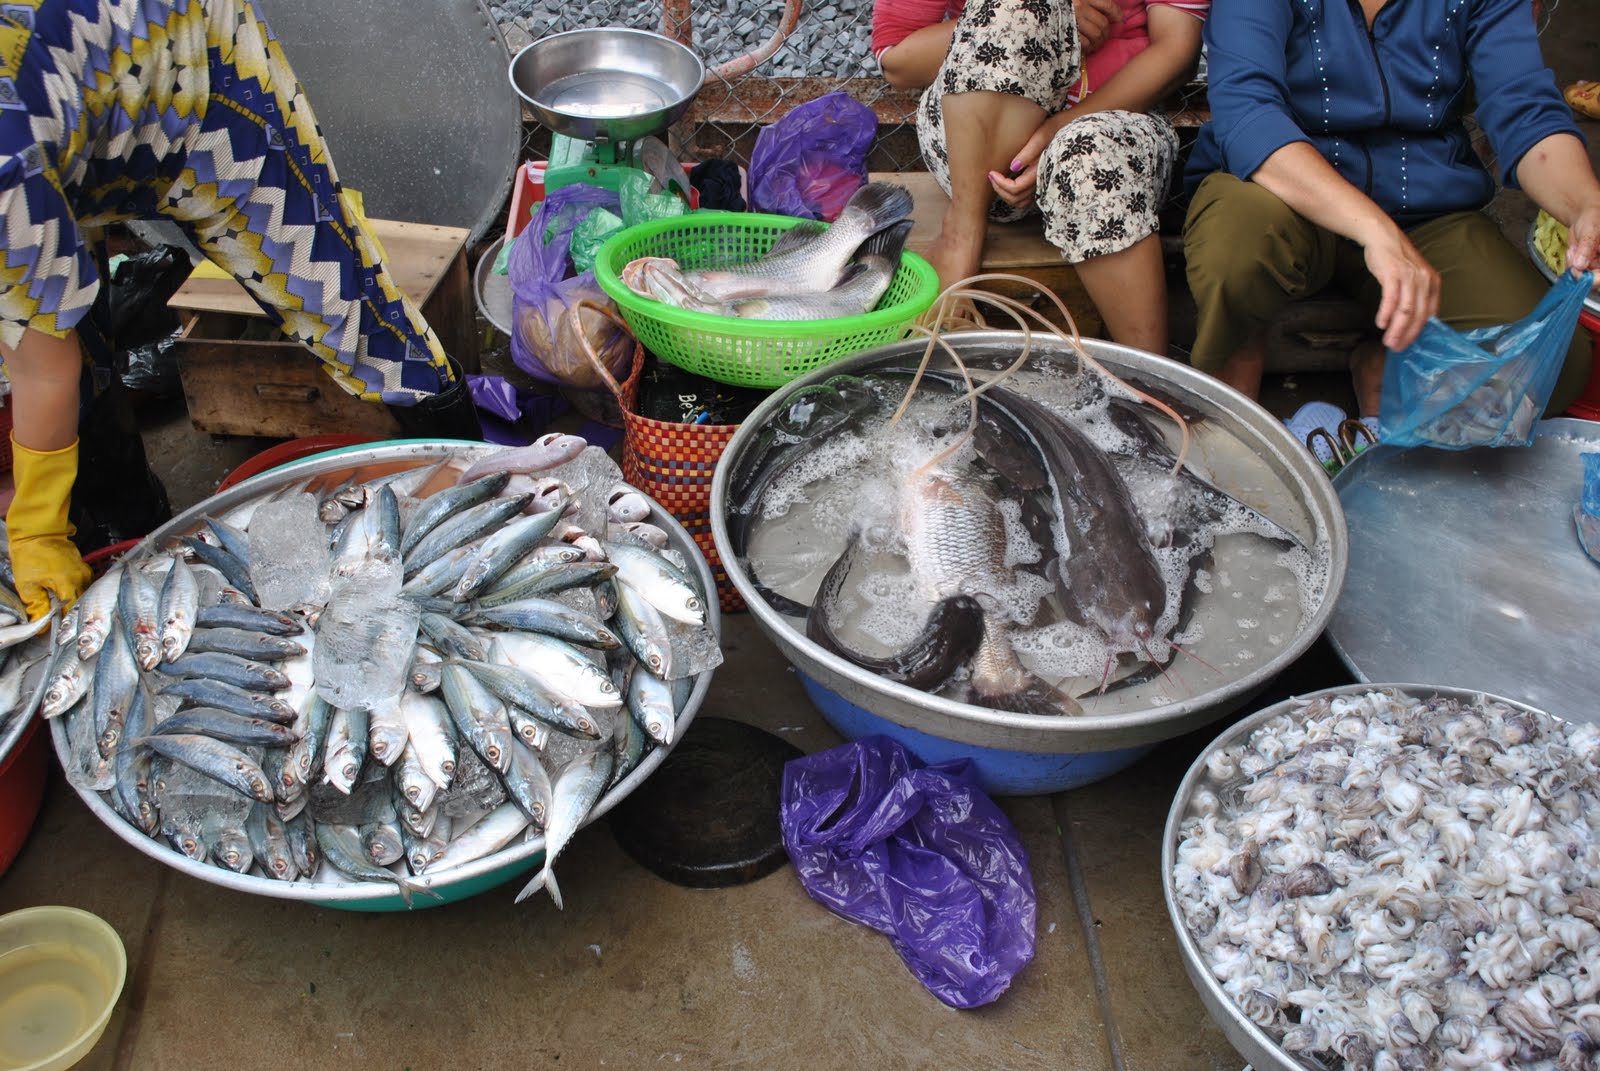
Selection of fresh fish and squid.

Studying up on candy, powders and spices.

Market in Saigon. Tiger beer in hand after a delicious lunch at the counter behind me.

Market in the Mekong Delta. Our guide is teaching me about Vietnamese ingredients such as Pomelo.

Typical meat stand in the market.

Wide selection of local rice.

I really wanted to bring back a suitcase of these chilies.

Share/Save/Bookmark

Monday, January 17, 2011

Vietnamese Crepes (Banh Xeo)

On the very first beach day of our honeymoon in Hoi An, we ordered some Banh Xeo, which literally translates to 'sizzling cake'. Essentially, these are crepes stuffed with pork and shrimp and are usually eaten for breakfast or lunch and served with peanut sauce. I wish I had a picture of Drew's face after he had his first bite. This was easily his favorite dish of the trip.

These crepes are made out of rice flour (you can find Thai rice flour pretty easily in stores or specialty stores), water, turmeric powder and coconut milk. As I mentioned, they are stuffed with shredded fatty pork, shrimp, and bean sprouts and then pan fried. They can become habit forming so consider yourself warned.

Banh Xeo

makes 2 crepes

Crepes
1 cup rice flour (Thai version)
1/2 cup water
1/2 cup coconut milk
1/2 teaspoon turmeric
pinch of salt
vegetable oil for frying

Filling
4 ounces small shrimp
4 ounces sliced roast pork
4 scallions, sliced
2 cups bean sprouts

Wrap
leafy lettuce leaves
Mint, Thai or Vietnamese basil and cilantro

In a bowl mix the rice flour, water, turmeric and salt.

Heat a little oil in a 10 inch non-stick pan and cook the pork and shrimp. When cooked through, add the scallions. Add a little more oil, you may need a tablespoon or two to make the crepe very crisp and chewy. Pour in 1/2 cup batter on top of the fillings and tilt the pan to spread the batter into a crepe. Top with bean sprouts and cook for several minutes until the bottom of the crepe is beginning to turn brown and very crunchy. Fold the crepe in half and drain on paper towels. Serve with lettuce and herbs and peanut sauce.
Share/Save/Bookmark

Sunday, January 16, 2011

Sweet Tamarind Crab (cua rang me)


Thanks to a good friend and a Tony Bourdain episode, Drew and I had one of the best meals of our lives at Thi Nhan in Hoi An, Vietnam. Sweet Tamarind Crab is relativity easy to make but it's the freshness of the crab that makes the dish. Thi Nhan is just steps away from the beach and each morning the fish market is flooded with fresh crab.

It's a messy meal but so incredibly worth it. They serve the crabs with a mixture of lemon juice with a TON of sea salt and ground pepper. Sounds a little overwhelming? It is when you taste it on its own but with the crab it is DY-NO-MITE. If we had stayed an extra day in Hoi An we would have eaten there twice - without question.

Sweet Tamarind Crab (cua rang me)
Makes 8 servings
6 whole fresh crabs
3 tablespoons canola oil
3 shallots, finely chopped
2 tablespoons tamarind paste
4 cloves garlic, finely minced
2 teaspoons garlic powder
2 teaspoons salt
2 kaffir lime leaves (optional), torn in half
2 teaspoons chili garlic sauce
3 tablespoons soy sauce (or fish sauce)
2 tablespoons palm sugar (or granulated sugar)
2 teaspoons fresh ginger (see tips)
1/4 cup water
1/2 cup Thai basil leaves
2 teaspoons white pepper, freshly ground
juice of 3 limes, + extra for serving

Clean the crabs, brush and rinse thoroughly. Separate the 2 main claws from each crab. Set aside.

Remove and discard the abdominal flaps (the triangle-shaped tail). Lift and separate the back-fin with the rest of the claws by placing a large tablespoon at the bottom of the crab. Remove and discard the "lungs" (also known as Devil's fingers; they have a spongy texture); they're inedible. Gather the liquid, crab "butter" and corals from the inside of the crabs in a bowl. Discard the main shells.

Using a cleaver, cut the back-fins in half and slightly crack the claws. Gather the pieces of crab in a large mixing bowl. Add the garlic powder, salt and 1 teaspoon of pepper. Toss well. Marinate for at least 15 minutes.

In the same bowl containing the crab liquid, combine the kaffir lime leaves (if used), 1 teaspoon of ginger, sugar, soy sauce (or fish sauce) and tamarind paste.

Slightly bruise the basil leaves and coarsely chop them.

In a wok, heat the oil. Add the shallots and ginger and cook until slightly golden and fragrant. Add the garlic. As soon as the garlic is lightly browned, add the crab pieces. Jiggle the wok to make sure the crab does not stick to the bottom of the wok and is totally coated with oil. Add the tamarind mixture. Constantly toss the crab to ensure each piece is coated with the sauce. As soon as all the liquid is evaporated, add the chili garlic sauce. Toss for 30 seconds and add ½ to one cup of water and about 2 tablespoons of basil leaves. Cover and cook for about 8-10 minutes, stirring often. The crab meat should be white and opaque and the liquid should be evaporated as well. Do not over-cook the crab; otherwise the meat will be dry! Un-cover and add the remaining basil leaves and the lemon juice. Toss the crab and cook for another 2-3 minutes. Adjust the seasoning. Season with more salt (if necessary) and pepper; it should balance the sour taste of the tamarind paste and the sweetness from the palm sugar and shallots. Remove and discard the kaffir lime leaves.

Transfer to a large platter. Serve with little dipping bowls filled with lime juice, chili salt (or regular salt) and pepper.


Share/Save/Bookmark

Thursday, January 13, 2011

New Year's Resolution: Blog More

I hate New Year's Resolutions. We've seen it all before. In fact, I saw it in my yoga studio yesterday - a packed class. The weeks will roll by and soon it will be the middle of February and it will be me and the same 15 people at the 6:30pm class as usual. New Year's resolutions are a great idea but tend to lose momentum after a few weeks. Let's not kid ourselves.

I just got back from a 3-week honeymoon in Vietnam. In fact, in the last 2 1/2 months, I have spent over a month in Asia. This means I've had a lot of train, plane and automobile time to reflect on 2010 and the year that it's been for Drew and me.

This year, my New Year's resolution is to blog more. I mean it. I'm done being selfish. In the last 8 months, I've planned a wedding, got married, got a new job, went on my honeymoon and time flew by. My heart breaks every time a friend or loyal reader asks me over email or on the phone, 'where have you been?!?' I've been a slacker blogger for sure.

Well, fear not. This year is going to be big (even more so if Blogger gives me access back to my account and I am not posting under Drew's publishing privileges!) so expect more. Get excited.

Happy 2011. Eat, drink and be merry.

Elizabeth
Share/Save/Bookmark

Thursday, December 16, 2010

Red Beans and Rice a la Phelps

I just started a new job on Monday and today was the office's annual holiday potluck. Timing worked out great; I was able to meet the whole office and bond over food. The stand out dish was my co-worker's red beans and rice. It was hearty, spicy and I had three helpings. He was kind enough to share his mother's recipe. He prefers doubling the hot sauce portion and uses Frank's Red Hot. Super tasty.

Red Beans and Rice A La Phelps

6 servings:

1 LB dried red chili (little red) beans, washed and picked over
1 ham hock with lots left on
1 lb Andouille Sausage, cut into 1” pieces
.5-1lb bacon
1 Lg. onion, chopped
6 cups water
2 cloves garlic, chopped
Bay leaf
to taste: hot sauce (3 glugs) and Worchester sauce (3 glugs) salt (only add after beans are soft, you may not need with ham and bacon)

bring water to boil. add beans. Cook 2 minutes. Turn off and cover for 1 hour or overnight.
bring back to boil. add all ingredients except salt and rice. Cook @ 3 to 4 hours. Remove hocks and take the meat off the bone. Add it back to the pot. Mash some beans to thicken. Add salt to taste (not too much!)

Serve over rice.

Optional but great additions: chipotle chilis in adobo sauce, fresh hot sausage (1 lb.)
May be doubled. Freezes well!
Share/Save/Bookmark

Wednesday, December 1, 2010

Risotto with Butternut Squash, Leeks, and Basil

Has anyone else read the December issue of Bon Appetit yet? It's actually a bomb issue. And by bomb, I mean that you want to eat every picture you look at and cook every recipe. Well, at least that's what I thought when I saw it arrive in my mailbox. Doesn't this just scream winter, cold weather and comfort?

Remember to be patient with our good friend Risotto. You don't want it underdone or overdone and gummy. So just add a little stock, stir and repeat. It's a labor of love and so worth it. Race you to the stove!

Risotto with Butternut Squash, Leeks, and Basil

  • 3 tablespoons olive oil, divided
  • 4 cups 1/2-inch cubes peeled butternut squash (from 2 1/4 pounds squash)
  • 3 cups 1/2-inch-wide slices leeks (white and pale green parts only)
  • 1 tablespoon chopped fresh thyme
  • 2 cups arborio rice
  • 4 14-ounce cans (or more) vegetable broth
  • 1 cup chopped fresh basil
  • 3/4 cup freshly grated Parmesan cheese plus additional (for serving)

Preparation

  • Heat 2 tablespoons oil in heavy large pot over medium-high heat. Add squash and sauté until beginning to soften and brown around edges, about 5 minutes. Transfer squash to medium bowl.
  • Reduce heat to medium; add remaining 1 tablespoon oil, leeks, and thyme to same pot and stir until tender but not brown, about 5 minutes. Add rice and stir 1 minute. Add 1 cup broth and simmer until absorbed, stirring frequently, 3 to 4 minutes. Add remaining broth by 1/2 cupfuls, allowing each addition to be absorbed before adding next, stirring often, about 15 minutes. Return squash to pot. Continue to cook until rice is just tender but still very creamy, stirring gently and often, about 10 minutes longer (about 25 minutes total cooking time). Remove from heat. Stir in basil and 3/4 cup freshly grated Parmesan cheese. Season to taste with salt and pepper. Transfer to large bowl and serve with additional Parmesan cheese.


Share/Save/Bookmark

Mike's Famous Holiday Eggnog


'Tis the season for all that is gluttonous! Just so happens to be my absolute favorite time of year! Shocking, right? Our house literally looks like the North Pole and I've been working around the clock to Christmas tunes on Pandora. I'm such a dork.

No winter holiday is complete without eggnog. So...back by very popular demand for the 3rd year in a row is (drum roll please...) MIKE'S FAMOUS EGGNOG!!!

Dear Reader, enjoy the holidays but do me a favor and don't drink and drive. Love you.

Eggnog in Quantity

• Be sure to use good fresh eggs. The best eggs have a firm orange yolk and are from hens that have access to free range.
• Use heavy whipping cream. This is not a drink that is successful in a low fat version.
• Use good quality liquor. I use a combination of liquors to spread out the flavors. The saying that "nothing succeeds like excess" is especially true when it comes to adding booze to the eggnog. The Brits say that "Christmas brandy will make you randy", so add an extra splash.
• Use fresh nutmeg kernels and grate onto each serving as desired.

Beat separately until light in color
12 egg yolks
Beat in gradually
1 lb. confectioner's sugar
Add very slowly, beating constantly
2 c. dark rum, brandy, or bourbon
These liquors form the basis of the "nog", and you may choose one
variety or mix to taste.

Let mixture stand covered for 1 hour to dispel the "eggy" taste.

Add, beating constantly,
3 cups of liquor (I use a combination and include some Kahlua)
2 quarts whipping cream
1 tsp vanilla (or to taste)
Refrigerate covered for 3 hours.

Beat until stiff but not dry
12 egg whites

Fold egg whites lightly into the other ingredients. Serve sprinkled
with fresh nutmeg and cinnamon to taste.

Yield is about 1 gallon. I always make a double batch. With all that liquor it keeps very well refrigerated. The egg whites will separate after standing so fold them back in. A jar of this eggnog makes a great holiday present. Have a cup while opening your presents. You'll love them all!

This is a very rich, high-cholesterol, high-octane eggnog. Do not operate heavy equipment after drinking.
Share/Save/Bookmark

Monday, November 22, 2010

Kung Pao Chicken


One of the dishes that I ordered more than once in Beijing was Kung Pao chicken. This dish is a schezuan staple. While the meal above was tasty, it wasn't as spicy as I had hoped it would be and I ended up drowning it in chili oil. Apparently, I've built up quite the tolerance over the last couple of years. Make sure you use unsalted peanuts or the dish will be ruined and control the heat using more or less chilies.

Kung Pao Chicken
3 pounds boneless, skinless chicken breasts, cut into 1-inch cubes
3 large egg whites
2 teaspoons salt
3 tablespoons Asian sesame oil
3 tablespoons cornstarch
3 cups peanut oil
6 dried red chilies
1½ cups unsalted peanuts
6 tablespoons minced garlic
½ cup finely chopped scallions
2 tablespoons chopped fresh ginger
1/3 cup chicken stock or canned chicken broth
1/3 cup Shaoxing rice wine or dry sherry
5 tablespoons reduced sodium soy sauce
2 teaspoons sugar
2 tablespoons Chinese black rice vinegar.

1. In a medium bowl, combine chicken, egg whites, 1 teaspoon of the salt, 1 tablespoon of the sesame oil and 2 tablespoons of the cornstarch. Mix well.

2. Place a large wok over high heat until hot. Add peanut oil. When oil is very hot, remove wok from heat and immediately add chicken pieces, stirring to keep them from sticking. When the pieces are white on all sides, after 2 to 3 minutes, drain them and all the oil through a stainless-steel colander in a heatproof bowl. Reserve 5 tablespoons of the oil, and discard remainder.

3. In a small bowl, combine remaining 1 tablespoon cornstarch with 1/3 cup water; mix well and set aside. Reheat wok with reserved oil. When very hot, add chilies and stir-fry until slightly blackened. Add peanuts, garlic, scallions and ginger, and stir-fry until lightly browned.

4. Add chicken pieces, stock, rice wine, soy sauce, sugar, vinegar, remaining 1 teaspoon salt and remaining 2 tablespoons sesame oil. Mix well, and stir in cornstarch mixture. Stir-fry for 2 minutes, then reduce heat to low and let mixture sit for 2 to 3 minutes. Mix again, and serve.


Share/Save/Bookmark

TEASPOON WILLIE’S SAVORY CHILI


An old friend from high school reached out to me on Facebook and told me about this new company he started with some friends called Teaspoon Willies. He was nice enough to send us a couple bottles to check it out and sure enough we blew through it in a matter of weeks. It's good on everything from eggs to marinades and even in bloody mary's. Fall weather has arrived and football is well under way. I can't think of a better way to use Teaspoon Willie's sauce than in this savory chili recipe. To get some of your own sauce, visit their site. Thanks for sharing this with us, Kevin!

TEASPOON WILLIE’S SAVORY CHILI(Serves 8-10)
Ingredients:
• 1.5 lb of ground beef/buffalo
• 1 large yellow onion, chopped
• 1 yellow green pepper, chopped
• 1 charred pablano pepper*
• 2 charred hatch chili’s (medium heat)*
• 1-2 carrots, chopped
• 1-2 stalks of celery
• 1 can of black beans
• 1 can of pinto beans
• 1 can of navy beans
• ¼ Cup of olive oil
• handful fresh parsley
• handful fresh cilantro
• 4 cloves garlic
• salt and pepper to taste
• 1 bottle of Teaspoon Willie’s Spicy or Everything Sauce
• 2-3 lbs tomato sauce all natural/organic
• 1 can of tomato paste

Directions:
*To char put the pablano and hatch chilies in a bowl and cover with olive oil and salt.
Make sure the pablano and hatch chilies are covered well. Turn on the grill or
broiler and char the outside. After they are charred, let them cool and chop up the
peppers. Make sure you keep the burned skin on the peppers, it gives great flavor
to the chili.

Heat a pot to medium-high. Chop up all the veggies, herbs, and spices. Put some oil
in the pot and mix veggies, herbs and spices. Add some salt and pepper to taste.
Cook for about 3-4 minutes. Next add beef/buffalo and the charred pablano and
hatch chilies. Chop up meat until it becomes fine, about 3-4min. Add about 10 oz of
Teaspoon Willie’s, tomato sauce, and tomato paste. Drain the beans of their liquid
and add to the pot as well. Let this simmer on low-medium for a couple of hours. Add
more Teaspoon Willie’s if you want to bring out more flavor.

*Remember that Teaspoon Willie’s Spicy will build heat with prolonged cooking.
This will produce VERY spicy Chili with phenomenally great taste. Add some of your
favorite cheese and/or sour cream (this will also bring down the spiciness). Enjoy!
Share/Save/Bookmark

Wednesday, November 10, 2010

Back from Beijing!


Dear Reader, I am finally back from a long trip to Beijing. I have over a hundred pics and a couple videos from my culinary journey that I cannot wait to share with you. For starters, here are some pictures taken from the Wangfujing Night market. As you can see, some pretty crazy stuff there that I was not brave enough to try.

On another note, Blogger has locked me out of my account so I am posting using my best friend's account. If you see Carrie, that's me until I can sort it out. More soon. Promise!
Share/Save/Bookmark

Friday, October 15, 2010

Widespread Panic Baked Ziti

Remember when you were in high school and you would 'carbo-load' the night before the big game? What if I told you that I'm going to carbo-load for a concert? It's ok, you can laugh at me.

My favorite band is in town and it's the one time a year that I can let loose and dance like a hippie for 3 1/2 hours. I've been seeing these guys for 12 years and after every show I am starving. This year, I thought that if I stock up on carbs before the show that maybe I won't need that burger at midnight. I figure it's worth a try. Here's what's on the menu...

Widespread Panic Baked Ziti
  • 12 ounces ziti (about 4 cups)
  • 1 tablespoon olive oil
  • 1 large onion, chopped
  • 2 cloves garlic, finely chopped
  • 1/4 pound lean ground beef
  • 1/4 pound Italian Sausage, removed from casing
  • kosher salt and black pepper
  • 1 26-ounce jar marinara sauce
  • 1 bunch spinach, thick stems removed (about 4 cups)
  • 1/2 cup ricotta
  • 1/2 cup grated Parmesan (2 ounces)
  • 1 cup grated mozzarella (4 ounces)
  • 1/2 teaspoon red pepper flakes
  1. Heat oven to 400° F. Cook the pasta according to the package directions. Drain it and return it to the pot.
  2. Meanwhile, heat the oil in a large skillet over medium heat. Add the onion and garlic and cook, stirring occasionally, until they begin to soften, 4 to 5 minutes.
  3. Add the beef, sausage, ¾ teaspoon salt, and ¼ teaspoon pepper, red pepper flakes and cook, breaking up the meat with a spoon until it’s no longer pink, 5 to 6 minutes.
  4. Toss the pasta with the meat mixture, marinara sauce, spinach, ricotta, and ¼ cup of the Parmesan.
  5. Transfer to a 9-by-13-inch baking dish or 4 large ramekins. Sprinkle with the mozzarella and the remaining ¼ cup of the Parmesan. Bake until the cheese melts, 12 to 15 minutes.

Share/Save/Bookmark

Thursday, October 7, 2010

Maple-Glazed Peanuts & Bacon

I was just browsing on the Food & Wine website this afternoon and came across a recipe for this peanut concoction. Suddenly, it hit me...I've eaten these before! See friends, there are some great people out there that send me random foodie stuff in the mail. I've received books, cheeses, special sauces, bacon chocolates and much more. But probably my favorite package came from my friend in NYC about 2 years ago that sent me a jar of these peanuts. According to the article, these have become so popular that The Red Head Restaurant in NYC now sells these online. With this recipe, you can skip the shipping fees and make it right at home.

Maple-Glazed Peanuts & Bacon
  1. 3 thick slices of bacon (3 ounces)
  2. 1 tablespoon thyme leaves, minced
  3. 1 tablespoon kosher salt
  4. 3/4 teaspoon Old Bay Seasoning
  5. 1/2 teaspoon cayenne pepper
  6. 1/2 teaspoon dry mustard
  7. 3 cups unsalted roasted peanuts (1 pound)
  8. 1/2 cup pure maple syrup
  1. Preheat the oven to 325°. In a medium skillet, cook the bacon over moderate heat until crisp. Transfer to paper towels to drain, then finely chop.
  2. In a medium bowl, mix the thyme, salt, Old Bay, cayenne and dry mustard. Add the peanuts, maple syrup and bacon and toss until the peanuts are evenly coated. Scrape the nuts onto a parchment paper–lined baking sheet and roast for about 30 minutes, stirring once, until the maple syrup has thickened. Let the peanuts cool completely, stirring frequently to break up any large clumps. Transfer the peanuts to glass jars or a large bowl and serve.
The peanuts can be stored in an airtight container for up to 5 days.

Share/Save/Bookmark

Wednesday, September 29, 2010

You buy clothes, I buy tomatoes

If Drew gave me $100 bucks and said 'go have fun', I'd probably end up at the farmers market or some specialty grocery store. It's sad really. As I write this, I notice that I am wearing a pair of jeans that I bought my first year out of college. But how can you possibly resist these gorgeous heirlooms above or anything that's in its prime for that matter? I mean, these looked so pretty that I had to take a picture on my phone and email it to Drew.

Heirloom tomatoes came into their prime very late this year and so far it's been worth the wait. I just wash them and serve them sliced with salt and pepper as a side dish and I've heard no complaints from my guests. Know your seasons and know your fruits and veggies. It's pretty easy to cook when you don't have to do much to something that is already perfect.
Share/Save/Bookmark

Monday, September 20, 2010

The Pig Next Door


The best wedding gift that we've received so far is a membership to The Pig Next Door's Bacon of the Month club. This is truly the gift that keeps on giving. We received our welcome kit in the mail a couple weeks ago, which included a mug that says 'Oink if you love bacon', followed by our first shipment. The shipment arrives on your door in a styrofoam cooler with an ice pack. I was pumped to open it and find a big slab of Hobb's.

Hobb's bacon is king. Some of the best restaurants in the world (including The French Laundry) use his cured delights on a daily basis. 76 year-old owner, Hobbs Shore, has mastered his craft on his ranch in west Marin, CA. His bacon has been long admired by San Francisco foodie circles. But back to the important stuff....

Do yourself a favor and join this club. What do you have to loose? It will be a cured meat adventure. Who knows what will arrive each month? Did I mention each shipment comes with a recipe and background about the meat? Come on, just go to the gym an extra day a month and you'll be guilt free. Happy baconing.
Share/Save/Bookmark

Friday, September 10, 2010

Tennessee Williams's Lemon Icebox Pie

I was catching up with one of my best friend's on the phone this week and she told me how she has really been getting into making retro desserts. One if particular that she insisted I share with all of you is this Lemon Icebox Pie. She was even kind enough to take a picture of her creation with her phone and send it to me. She used whole Nilla wafers to give it an extra visual effect. The result, as Tennessee Williams always said, "is good enough to slap your Mama."

Thanks, Lindsay!

Tennessee Williams's Lemon Icebox Pie
Epicurious
  • 1/2 box vanilla wafers
  • 1 stick lightly salted butter
  • 1/2 cup lemon juice, freshly squeezed
  • 1 can condensed milk, preferably Eagle Brand
  • 1 egg yolk
  • 6 egg whites
  • 1/2 teaspoon cream of tartar
  • 1/2 teaspoon vanilla extract
  • 3/4 cup sugar
Accompaniment: grated lemon rind
Special equipment: pie plate

In a food processor, finely crush vanilla wafers. Melt butter for flavor (not sweet butter). Pour vanilla wafers and melted butter into a pie plate and shape into a pie shell with your fingers.

In a large bowl, mix lemon juice, condensed milk, and egg yolk. Pour mixture into pie plate. In another bowl, beat egg whites* with cream of tartar, vanilla extract, and sugar until stiff white peaks form. Pour over pie and top with freshly grated lemon rind.

Bake in oven at moderate heat just long enough for meringue to brown, about 20 minutes. Cool to room temperature and put in the refrigerator until ice-cold.


Share/Save/Bookmark

Thursday, September 9, 2010

Chicken Enchiladas

I know, I know. It's been forever. In fact, the longest time between posts EVER. But there is a good reason for this. Dear Reader, I just got married. Yup, I'm off the market for good. And you'll be very pleased to know that I have been eating a drinking my way through Cape Cod feasting on little-necks and lobster.

Leading up to the wedding was another story. A cottage cheese diet has me bored and starved. I ate no Mexican food for an entire month. I feel like a criminal. Now that I have returned as Mrs. Smith to sunny California, it's time to catch up on one of my favorite cuisines.

A good friend flew home the other night and sat next to Tyler Florence on the plane. She said he was the world's nicest guy. Here's a little Tyler recipe with plenty of cheese to remind me what I've been missing.

Chicken Enchiladas
Food Network
  • 3 tablespoons vegetable oil
  • 1 1/2 pounds skinless boneless chicken breast
  • Salt and pepper
  • 2 teaspoons cumin powder
  • 2 teaspoons garlic powder
  • 1 teaspoon Mexican Spice Blend
  • 1 red onion, chopped
  • 2 cloves garlic, minced
  • 1 cup frozen corn, thawed
  • 5 canned whole green chiles, seeded and coarsely chopped
  • 4 canned chipotle chiles, seeded and minced
  • 1 (28-ounce) can stewed tomatoes
  • 1/2 teaspoon all-purpose flour
  • 16 corn tortillas
  • 1 1/2 cups enchilada sauce, canned
  • 1 cup shredded Cheddar and Jack cheeses
  • Garnish: chopped cilantro leaves, chopped scallions, sour cream, chopped tomatoes

Coat large saute pan with oil. Season chicken with salt and pepper. Brown chicken over medium heat, allow 7 minutes each side or until no longer pink. Sprinkle chicken with cumin, garlic powder and Mexican spices before turning. Remove chicken to a platter, allow to cool.

Saute onion and garlic in chicken drippings until tender. Add corn and chiles. Stir well to combine. Add canned tomatoes, saute 1 minute.

Pull chicken breasts apart by hand into shredded strips. Add shredded chicken to saute pan, combine with vegetables. Dust the mixture with flour to help set.

Microwave tortillas on high for 30 seconds. This softens them and makes them more pliable. Coat the bottom of 2 (13 by 9-inch) pans with a ladle of enchilada sauce. Using a large shallow bowl, dip each tortilla in enchilada sauce to lightly coat. Spoon 1/4 cup chicken mixture in each tortilla. Fold over filling, place 8 enchiladas in each pan with seam side down. Top with remaining enchilada sauce and cheese.

Bake for 15 minutes in a preheated 350 degree F oven until cheese melts. Garnish with cilantro, scallion, sour cream and chopped tomatoes before serving. Serve with Spanish rice and beans.


Share/Save/Bookmark

Tuesday, July 20, 2010

Meyer Lemon Bars

I just got back from a girls weekend in Napa and my friend's Meyer lemon tree was kickin' with fruit. Before I left, I asked if I could harvest some to take back to the city, promptly filled up a bag and headed home to make lemon bars. I'm not a sweets person as I have said a million times on here but, boy, I can always go for anything with citrus of any kind. Lemon bars are easy, tasty and tart. Making them with Meyer lemons makes them even better. Here is a recipe from the sunny, celebrity-clad Hamptons (aka Ina Garten)

Meyer Lemon Bars

For the crust:

  • 1/2 pound unsalted butter, at room temperature
  • 1/2 cup granulated sugar
  • 2 cups flour
  • 1/8 teaspoon kosher salt

For the filling:

  • 6 extra-large eggs at room temperature
  • 3 cups granulated sugar
  • 2 tablespoons grated lemon zest (4 to 6 lemons)
  • 1 cup freshly squeezed lemon juice
  • 1 cup flour
  • Confectioners' sugar, for dusting

Preheat the oven to 350 degrees F.

For the crust, cream the butter and sugar until light in the bowl of an electric mixer fitted with the paddle attachment. Combine the flour and salt and, with the mixer on low, add to the butter until just mixed. Dump the dough onto a well-floured board and gather into a ball. Flatten the dough with floured hands and press it into a 9 by 13 by 2-inch baking sheet, building up a 1/2-inch edge on all sides. Chill.

Bake the crust for 15 to 20 minutes, until very lightly browned. Let cool on a wire rack. Leave the oven on.

For the filling, whisk together the eggs, sugar, lemon zest, lemon juice, and flour. Pour over the crust and bake for 30 to 35 minutes, until the filling is set. Let cool to room temperature.

Cut into triangles and dust with confectioners' sugar.


Share/Save/Bookmark

Thursday, July 15, 2010

Japanese Hamburgers

I have a friend that swears by this recipe. I had her over on Sunday night for Shrimp & Grits and she wouldn't stop talking about it so I asked for the recipe. She came across it on a fellow blog, Just Hungry. The two biggest differences? Adding pork to the meat and the sauce made with tonkatsu. Give it a try.

Japanese style hamburger (Hambaagu or hambaagaa)

This makes 4 small hamburgers, serving 2 to 4 people depending on what else you are serving.

  • 200g/ about 7 oz. ground beef (from a cut that has a fair amount of fat in it - very lean beef will not work because it will be too dry.)
  • 100g / about 3 1/2 oz. ground pork
  • 1/2 medium onion
  • 3/4 tsp. salt
  • About 1/2 tsp. ground black pepper
  • About 1/4 tsp. ground nutmeg
  • 1 cup soft white breadcrumbs (Make the breadcrumbs from regular white bread slices with the crusts off. The crumb of a baguette is really good for this.)
  • 2-3 Tbs. milk
  • 1 egg
  • Oil for cooking

For the sauce:

  • 1/2 cup dry red wine
  • 1/3 cup ketchup
  • 1/3 cup Japanese tonkatsu sauce such as Bulldog brand

Chop the onion very finely. Sauté the onion in a little oil until translucent. Let cool.

Moisten the breadcrumbs with the milk. Combine the meat, cooled onions, moistened milk, egg, salt, ground pepper and nutmeg. Your hands are the best tools for this. Combine well until everything is amalgamated.

Divide into 4 portions. Form into patties, slapping each with your palms until the surface is smooth. Indent the middle with your thumb - this makes sure the middle gets cooked evenly.

Heat up a large frying pan with some oil over high heat. Place the hamburgers well apart in the hot pan, and fry until browned. Turn over and turn the heat down to low. Put a tight fitting lid on the pan and steam-cook the hamburgers for about 10 minutes until the middle bounces back if you press down on it. Take out and keep warm.

Pour out any excess oil from the pan and turn the heat up to high again. Add the red wine and deglaze the pan with it (scrape off the brown bits and blend). Add the ketchup and the Bulldog sauce and blend. Pour over the hamburgers.

They are best served piping hot, but they are also very popular for bento boxes.


Share/Save/Bookmark

Monday, July 12, 2010

Grilled Softshell Crabs with Jicama Salad and Tomato–Avocado Salsa

What caught my eye in this recipe was that the crabs are grilled. Usually soft shell crabs are fried! Chef Rick Bayless created this recipe and I can imagine sitting in one of his Chicago restaurants enjoying this dish. Don't be afraid of soft shell crabs. They are delicious and eaten whole. Call your local seafood store to check if they have any in stock. Bon appetit!

Grilled Softshell Crabs with Jicama Salad and Tomato–Avocado Salsa

1 medium jicama, peeled and julienned
3 medium cucumbers, peeled, seeded, and julienned
1 cup coarsely chopped fresh cilantro, plus sprigs for
garnish
7 tbsp. extra-virgin olive oil
5 tbsp. fresh lime juice
Salt
2 medium tomatoes, diced
3 serrano chiles, seeded, if desired, and minced
1 clove garlic, peeled and minced
1 medium white onion, peeled and finely chopped
1 avocado, peeled and diced
8 softshell crabs, cleaned
1 lime, cut into wedges

1. Combine jicama, cucumber, and 1/2 cup chopped cilantro in a medium bowl. Dress with 4 tbsp. olive oil and 4 tbsp. lime juice. Season to taste with salt, mix well, and set aside.

2. In a separate bowl, combine tomatoes, chiles, garlic, onions, avocado, and remaining chopped cilantro. Dress with remaining lime juice, season with salt, and mix gently; set aside.

3. Lightly brush a hot grill or grill pan with 1 tbsp. oil. Brush crabs with remaining 2 tbsp. oil, then place on grill and cook until firm, about 2 minutes on each side. To serve, divide jicama salad and tomato-avocado salsa among four plates. Top each plate with 2 crabs and garnish with cilantro sprigs and lime wedges.


Share/Save/Bookmark